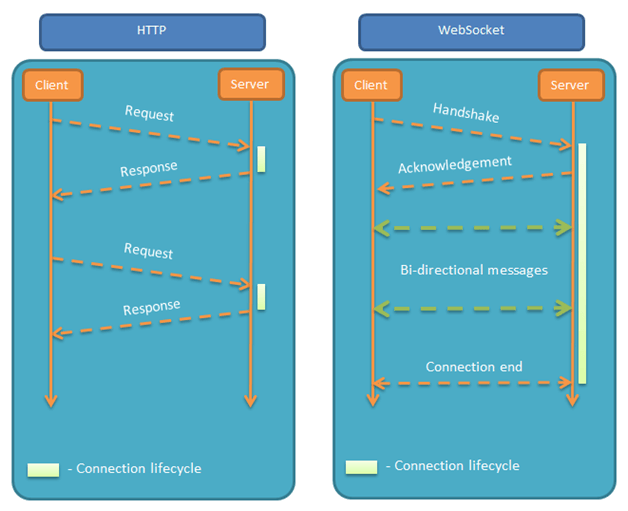
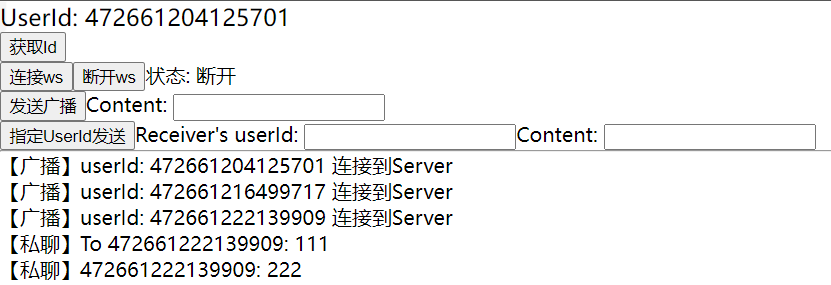
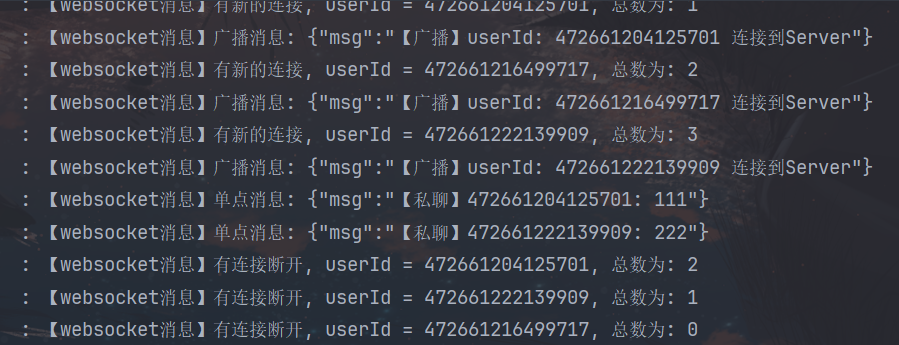
Loading... # Springboot 整合 WebSocket ## 引入 HTTP协议是被动的,每次数据交互都需要进行TCP握手(除非长连接),且只能由客户端主动获取数据 而WebSocket协议是在单次TCP连接上进行全双工通信的协议,可以由服务端主动推送数据给客户端  ## WebSocket ### 简介 其特点包括: - 建立在 TCP 协议之上,服务器端的实现比较容易。 - 与 HTTP 协议有着良好的兼容性。默认端口也是80和443,并且握手阶段采用 HTTP 协议,因此握手时不容易屏蔽,能通过各种 HTTP 代理服务器。 - 数据格式比较轻量,性能开销小,通信高效。 - 可以发送文本,也可以发送二进制数据。 - 没有同源限制,客户端可以与任意服务器通信。 - 协议标识符是`ws`(如果加密,则为`wss`) ### 代码实现 #### 服务端 完整代码见 [ws-demo](https://github.com/mashirot/ws-demo) ##### 环境 `JDK17`, `Gradle8.4`, `Kotlin1.9.10`, `SpringBoot 3.1.4` ##### 项目结构 ``` ├─kotlin │ └─ski │ └─mashiro │ │ WsDemoApplication.kt │ ├─annotation │ │ Slf4j.kt │ ├─config │ │ WebMvcConfig.kt │ │ WebSocketConfig.kt │ ├─controller │ │ WebSocketController.kt │ └─ws │ WebSocketServer.kt └─resources application.yml ``` ##### 依赖 ```kotlin dependencies { implementation("org.springframework.boot:spring-boot-starter-web") // https://mvnrepository.com/artifact/org.springframework.boot/spring-boot-starter-websocket implementation("org.springframework.boot:spring-boot-starter-websocket") implementation("com.fasterxml.jackson.module:jackson-module-kotlin") implementation("com.github.yitter:yitter-idgenerator:1.0.6") implementation("org.jetbrains.kotlin:kotlin-reflect") testImplementation("org.springframework.boot:spring-boot-starter-test") } ``` ##### Config ###### WebMvcConfig ```kotlin @Configuration class WebMvcConfig: WebMvcConfigurer { override fun addCorsMappings(registry: CorsRegistry) { registry.addMapping("/**") .allowedOriginPatterns("*") .allowedHeaders("*") .allowedMethods("*") .allowCredentials(true) } } ``` ###### WebSocketConfig ```kotlin @Configuration class WebSocketConfig { @Bean fun serverEndpointExporter(): ServerEndpointExporter { return ServerEndpointExporter() } } ``` ##### WebSocketServer ```kotlin @Service @Slf4j @ServerEndpoint("/api/ws/{userId}") class WebSocketServer { private var session: Session? = null private var userId: Long? = null // 里面的相当于Java的static变量 companion object { private val webSockets = CopyOnWriteArraySet< WebSocketServer>() private val sessionPool = ConcurrentHashMap<Long, Session>() } @OnOpen fun onOpen(session: Session, @PathParam("userId") userId: Long) { this.session = session this.userId = userId webSockets.add(this) sessionPool[userId] = session logger.info("【websocket消息】有新的连接, userId = $userId, 总数为: ${webSockets.size}") } @OnClose fun onClose() { webSockets.remove(this) sessionPool.remove(userId) logger.info("【websocket消息】有连接断开, userId = $userId, 总数为: ${webSockets.size}") } @OnMessage fun onMessage(message: String) { logger.info("【websocket消息】收到客户端消息: $message"); } @OnError fun onError(session: Session, error: Throwable) { logger.error("【websocket消息】错误, userId: $userId, 原因: ${error.message}") } fun broadcast(msg: String) { logger.info("【websocket消息】广播消息: $msg") webSockets.forEach { try { if (it.session!!.isOpen) { it.session!!.asyncRemote.sendText(msg) } } catch (e: Exception) { e.printStackTrace() } } } fun sendMsg2User(userId: Long, msg: String) { val session = sessionPool[userId] ?: run { logger.error("userId: $userId 不在sessionPool中") return } try { session.userPrincipal if (session.isOpen) { logger.info("【websocket消息】单点消息: $msg") session.asyncRemote.sendText(msg) } } catch (e: Exception) { e.printStackTrace() } } fun sendMsg2Users(userIds: LongArray, msg: String) { userIds.forEach {userId -> sendMsg2User(userId, msg) } } } ``` ##### WebSocketController ```kotlin @RestController @RequestMapping("/api/rest/ws") class WebSocketController( private val webSocketServer: WebSocketServer, ) { @PostMapping("/broadcast") fun broadcast(@RequestBody msg: String) { webSocketServer.broadcast(msg) } @PostMapping("/sendMsg/user/{userId}") fun sendMsg2User(@PathVariable userId: Long, @RequestBody msg: String) { webSocketServer.sendMsg2User(userId, msg) } @PostMapping("/sendMsg/users") fun sendMsg2Users(@RequestParam userIds: LongArray, @RequestBody msg: String) { webSocketServer.sendMsg2Users(userIds, msg) } @GetMapping("/userId") fun getUserId(): String { return YitIdHelper.nextId().toString() } } ``` #### 客户端 完整代码见 [ws-demo-client](https://github.com/mashirot/ws-demo-client) ##### 环境 `Node20.5.1`, `Vue3`, `axios1.5.1` ##### App.vue ```vue <template> <h3>UserId: {{ userId }}</h3> <div class="operation"> <div> <button type="button" @click="getUserId">获取Id</button> </div> <div> <button type="button" @click="connect2Server">连接ws</button> <button type="button" @click="disconnect2Server">断开ws</button> <span>状态: {{ connectStatus }}</span> </div> <div> <button type="button" @click="broadcast">发送广播</button> <span>Content: </span><input type="text" v-model="broadcastContent"> </div> <div> <button type="button" @click="privateChat">指定UserId发送</button> <span>Receiver's userId: </span><input type="text" v-model="privateChatUserId"> <span>Content: </span><input type="text" v-model="privateChatContent"> </div> </div> <hr/> <div> <div v-for="(msg, idx) in msgQueue" :key="idx"> {{ msg }} </div> </div> </template> <script setup> import axios from "axios"; import {reactive, ref} from "vue"; const uri = "127.0.0.1:8080" const httpUri = `http://${uri}` const wsEndpoint = `ws://${uri}/api/ws/` const userId = ref(0); const connectStatus = ref("断开") const broadcastContent = ref("") const privateChatUserId = ref("") const privateChatContent = ref("") const msgQueue = reactive([]) let webSocket; const getUserId = () => axios.get(`${httpUri}/api/rest/ws/userId`) .then(resp => { userId.value = resp.data }) .catch(e => console.log(e)); function connect2Server() { // 详细可看:https://cloud.tencent.com/developer/article/1887095 webSocket = new WebSocket(wsEndpoint + userId.value); webSocket.onopen = onOpen webSocket.onclose = onClose webSocket.onerror = onErr webSocket.onmessage = onMessage } function disconnect2Server() { webSocket.close() } const send2Server = (msg) => { webSocket.send(msg); } const onOpen = () => { sysBroadcast(`【广播】userId: ${userId.value} 连接到Server`) connectStatus.value = "连接" } const onClose = (e) => { sysBroadcast(`【广播】userId: ${userId.value} 断开连接, ${e.code}`) connectStatus.value = "断开" } const onMessage = (e) => { // data的数据是像这样: {"msg":"【广播】userId: 472661222139909 连接到Server"} // 似乎是通过eval将json转为对象,我的前端半桶水,欢迎斧正 const data = eval("(" + e.data + ")") msgQueue.push(data.msg) } const onErr = () => console.log("WebSocket连接发生错误") const broadcast = () => { axios.post(`${httpUri}/api/rest/ws/broadcast`, { msg: "【广播】" + userId.value + ": " + broadcastContent.value }) broadcastContent.value = "" } const sysBroadcast = (msg) => axios.post(`${httpUri}/api/rest/ws/broadcast`, { msg: msg }) const privateChat = () => { axios.post(`${httpUri}/api/rest/ws/sendMsg/user/${privateChatUserId.value}`, { msg: "【私聊】" + userId.value + ": " + privateChatContent.value }) msgQueue.push(`【私聊】To ${privateChatUserId.value}: ${privateChatContent.value}`) privateChatUserId.value = "" privateChatContent.value = "" } </script> ``` ### 测试 1. 运行前后端,多开几个客户端窗口 2. 客户端先获取userId,然后连接ws,状态变为`连接` 3. 客户端在连接到服务器后会进行broadcast,声明自己已经上线 4. 分别测试广播,点对点发送 5. 在浏览器开发者工具的网络中可看到ws连接,`消息`中可看到记录 效果:   <br /> 参考: 1. [WebSocket 教程](https://www.ruanyifeng.com/blog/2017/05/websocket.html) 2. [springboot整合webSocket(看完即入门)](https://zhuanlan.zhihu.com/p/613527997) 最后修改:2023 年 10 月 17 日 © 允许规范转载 打赏 赞赏作者 支付宝微信 赞 本作品采用 CC BY-NC-SA 4.0 International License 进行许可。